When a Picture Is Worth a Thousand Words: Visual Program Evaluation
Most people are familiar with the phrase “a picture is worth a thousand words,” but few consider what it means. Photographs are able to tell stories, and they can help your congregation see its ministries with fresh eyes.
Photographs sometimes capture deep meanings that words alone cannot convey. But even the best photos place some of the responsibility of interpretation on the viewer. And, just as with words, photos can be misunderstood.
One reason we may miss the meanings encoded in photographs can be explained by a Chinese proverb: “We see what is behind our eyes.” We interpret the world through our own experiences. Meanings may be missed or misinterpreted because we lack the intellectual equipment or life experience necessary for comprehension. If this proverb is true, then our photographs should reveal something about photographers and viewers alike: They reveal what is behind one’s eyes—how one thinks, feels and acts, as well as the meanings attached to our ideas, emotions and actions.
As a visual sociologist, my work involves reading other people’s photographs to try to understand what is going on behind their eyes. I do so with some degree of apprehension, knowing that my own interpretive framework—what is behind my own eyes—may blind me to some of the meaning and nuance intended by the photographer. One strategy I use to ensure I understand a photo is simple: I discuss it with the photographer. Over the last several years I have developed ways to use conversations about photographs—what I call visual techniques—to help evaluate, innovate and engage ministries.
Program evaluation is an important yet perhaps too infrequent practice in congregations. Visual evaluation is just one technique congregations can use. Though it may be new to many people, visual evaluation still follows the basic pattern of any social scientific research: First plan, then collect feedback, analyze and, last, innovate and improve. But there are some additional ethical and technical considerations when using this technique. Here is a recipe for visual evaluation with an overview of each step in the process:
STEP 1 | PLAN
Planning provides a foundation for a project by specifying the work to be done, who will do it, and how it will be accomplished.
- What will you evaluate?
Perhaps this question is obvious, but it is important to be specific about the work you are setting out to do. Identify the specific program or component of a program to be evaluated.
- Who will conduct the evaluation?
It is possible to conduct the evaluation as an individual evaluator or with a small team. An individual may have advantages such as agility and ease of scheduling meetings, but a team of two or three people will help to spread out the workload and provide diversity of insights and perspectives.
- On what basis will you evaluate the program?
Any program should have stated goals and/or anticipated outcomes that should be used to measure its effectiveness. Whether or not a program achieves what it sets out to accomplish is a main concern of program evaluation.
- Who will provide the feedback?
Depending on the number of people involved in the program or initiative under evaluation, it may be impractical to include everyone in the process. Ten to twenty participants are manageable, but how will they be selected?
Ideally an evaluator will think about the demographics of those involved and recruit a diverse group of people to provide feedback. But sometimes convenience is more important, so those chosen might just be the first 15 people to walk through the door during the program’s next meeting. A third approach is called a “snowball sample”: Choose one or two people as a starting point and then ask them to suggest someone else to involve in the evaluation. Each of these approaches can lead to a meaningful program assessment.
- How many meetings will you have?
The evaluation technique described below may be conducted in a single meeting or in a two-meeting sequence. The advantage of a single meeting is efficiency: In two hours or so, the data collection will be complete. But with only one meeting people may feel rushed or not have access to the places, objects, people or activities they want to photograph. A two-meeting sequence gives people more time to think about the program, a wider range of options for photography and the option of bringing prints of participants’ photographs to the second meeting to share with the evaluation group. But it’s hard enough to find a time when most people can make a first meeting; getting them to commit to a second one and do a little homework (i.e., take photos) is another matter. Either way, a facilitator will do well to make it easy for people to participate.
STEP 2 | COLLECT FEEDBACK
- Introduce the project.
Explain to participants what you hope to accomplish. Go over how you will spend your time together, describe how the group will take and talk about photographs and explain what will happen with the visual and verbal information they provide. Finally, assure people that they do not need to be excellent photographers in order to take part in the evaluation.
- Emphasize ethical photography.
Ethical photography requires the person behind the camera to ask herself, “If I were the subject of this photograph, would I want to be represented in this way?” This thinking needs to go beyond any people who might be shown in pictures to include respect for the objects and places that belong to them.
Participants should be instructed to follow three basic guidelines of ethical photography: (a) Ask permission to take someone else’s photograph; (b) do not intrude into someone else’s personal space; and (c) do not misrepresent other people or show them in a negative light. (For a more detailed discussion of visual research ethics, see the Studying Congregations website.)
- Provide verbal and written instructions about what to photograph.
It’s important to give participants guidance about what to include in their photographs. Too much guidance, however, will undermine the evaluation like an attorney leading the witness. Providing broad categories is helpful. One effective method has participants think about an agricultural metaphor and take photographs about areas of effectiveness (wheat), weaknesses (weeds) and possibilities (seeds).
Here is an example of those instructions:
Take five to ten photos that describe your experiences as a participant in [name of program]. Try for at least one photograph in each of the following categories: (1) program strengths, where it is effective and flourishing (wheat), (2) program weaknesses (weeds), and (3) possibilities or areas of opportunity the program should nurture (seeds).
If the evaluation is to take place over two meetings, these instructions could also include a reminder about the subsequent meeting and information about how to submit their photos to the facilitator prior to the next meeting.
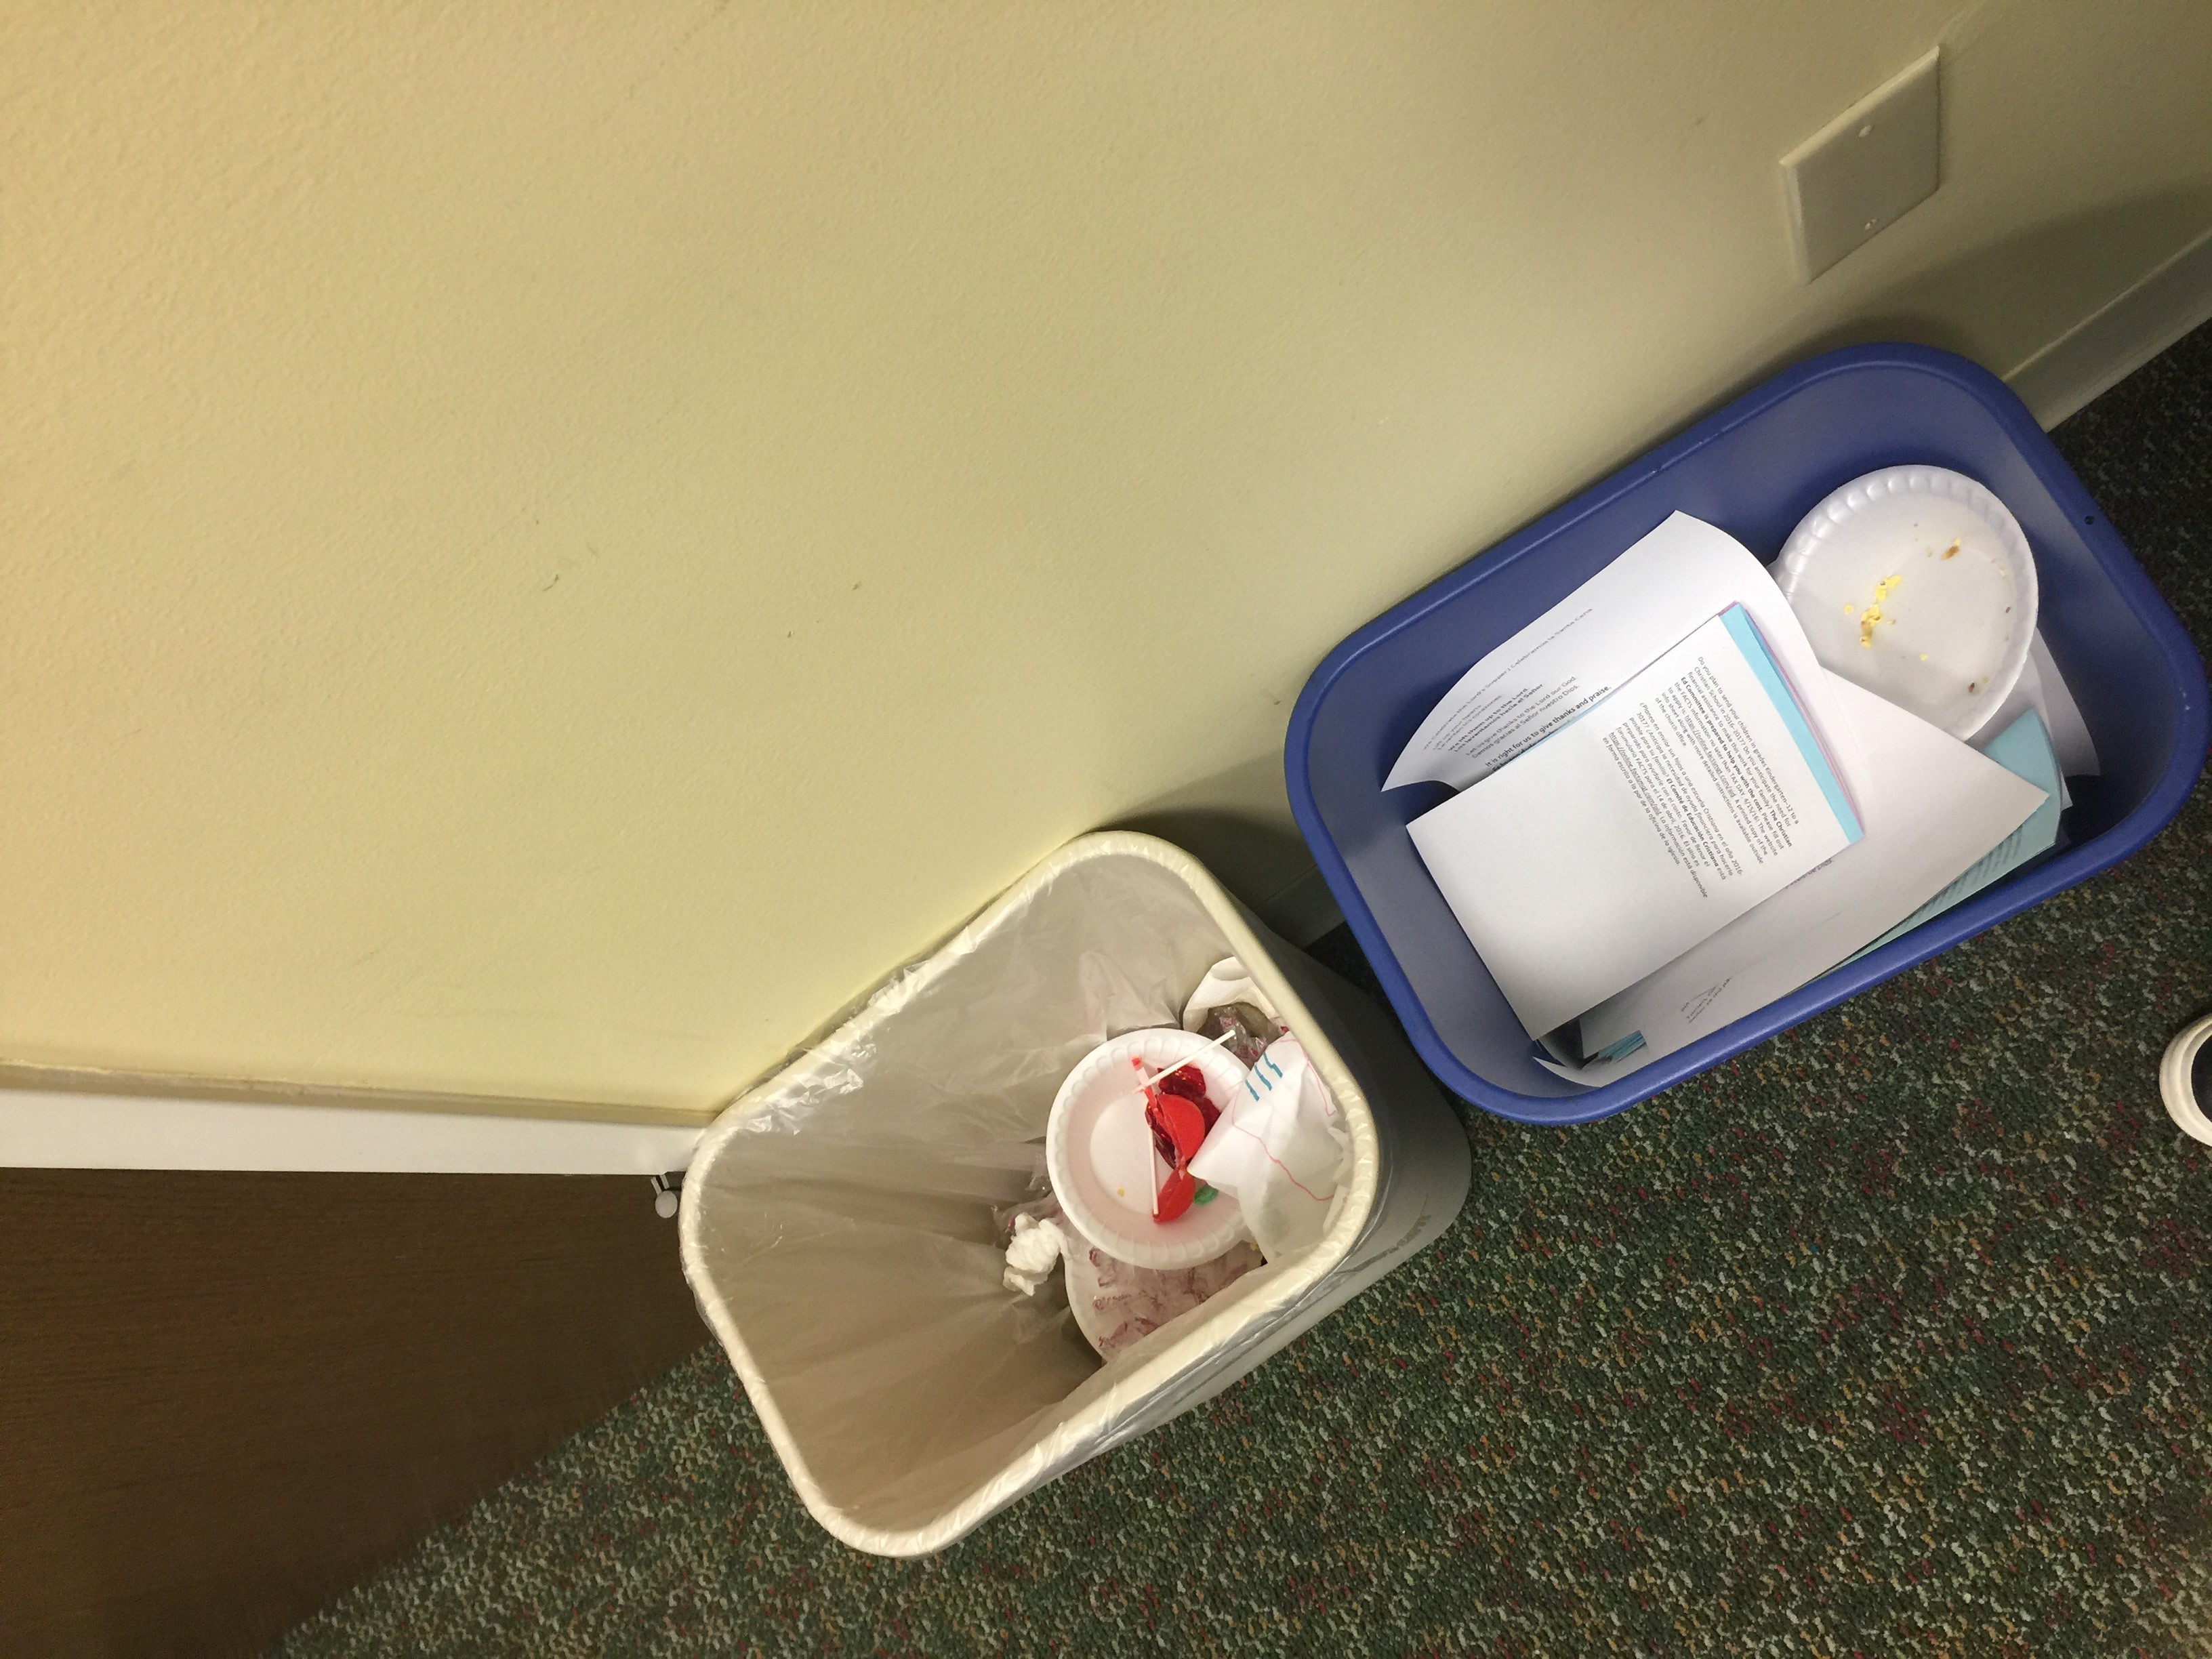
This photo was taken by a participant to raise questions about recycling: the blue recycling container shows the church tries (wheat), but the garbage in it suggests some people don’t know what to do (weed).
- Take photos.
Now that participants have been briefed about how to take photos ethically and what kinds of things to shoot, it’s time to take the pictures. For evaluations during a single meeting, 10–15 minutes should be enough time. In two-meeting evaluations, a shorter period of 5–7 minutes may be used to give participants a chance to practice before dismissing them with an assignment to take photos of the program.
- Show and share photographs.
Invite participants to show their photos to one another in groups of two or three and to share what the images say about the program. As these small-group conversations begin to wind down, the facilitator should transition into a large-group conversation. Helpful questions include:
- What did your conversation reveal about the program?
- What did you see—and what’s behind your eyes and the eyes of your conversation partner?
- What did your photographs have in common?
- Were you surprised by any of your conversation partners’ statements or photos?
- What did you learn about the program?
- In each category (wheat, weeds and seeds), which insights resonate with you? Do you disagree with any?
As the conversation progresses, the evaluator(s) should write participants’ insights on a dry erase board or flip chart. After working through these questions, the insights may be used to solidify the group’s feedback by asking if participants see any broad themes or patterns in the information. Likewise, if on the basis of this information an evaluator develops hunches about a program’s effectiveness, weaknesses or potential, this is a good time to begin testing those ideas. Statements that begin with, “What I think I hear you saying is . . .” and then echo back participants’ ideas are an effective way to do that.
- Look, listen and collect feedback.
Throughout the meeting evaluators should jot notes about what is happening and what they are hearing. At the end of the meeting, preserve the notes that were made on the dry erase board or flip chart—perhaps use a smartphone to photograph them. Also collect copies of participants’ photographs by asking them to email copies to you. Finally, as soon as possible after the meeting, write up a detailed description of what you observed and any insights you gathered about the program under evaluation.
STEP 3 | ANALYZE
Some of the work of analysis was accomplished during the meetings with participants, but further analysis will also help you think critically about the program under evaluation. Look through the photos you gathered and use the following questions to guide your analysis.
- What do you see in the photos?
Spend time looking through all the photos so that you become familiar with what participants provided. As a leader in your congregation you may see an additional layer of information about the program. What insights do you bring to the photos as an evaluator?
- What do the participants say, either visually or verbally, about the program?
Next, bring participants’ verbal feedback into conversation with the photos. Refer to your notes and photos (if you took any) to review what participants told you. Sort the photos and accompanying statements or insights into categories (wheat, weeds and seeds). In each category identify any overarching themes or key insights and identify specific photos or statements to illustrate them.
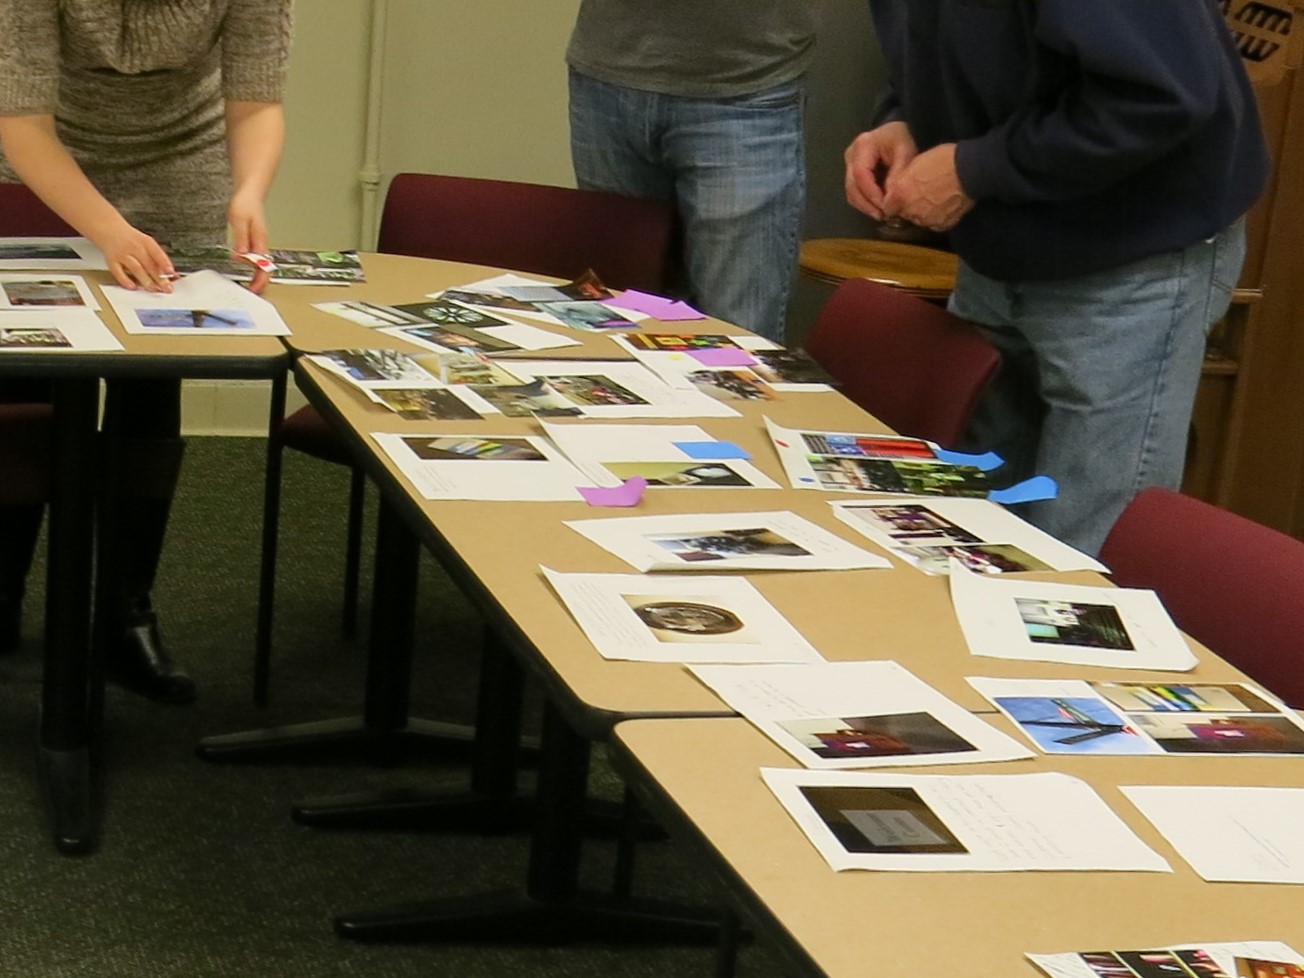
A group sifting through data to identify key themes.
- What does the collection of insights say about program outcomes?
Now that you have a good handle on what you and your participants think about the program, it’s time to see how the program measures up to its intended outcomes. Your goal is to understand what the evidence from the evaluation tells you about the program, where its strengths and weaknesses lie and how it might be improved. List the program outcomes and use participants’ feedback (statements and photos) to evaluate each one.
STEP 4 | INNOVATE AND IMPROVE
The evaluation will identify a range of successes, failures and suggestions about how the program might be improved. It is time to decide what to do with these insights and to make adjustments that build on successes, address weaknesses and innovate based on what was learned. At the very least the evaluation team should create a summary report that discusses the process of evaluation, what was discovered and any changes that will result from the evaluation. It is also a good idea to bounce your findings off key participants and leaders in order to test your conclusions. Any additional feedback should be used to refine the report and plans for program improvements. Participants will like to know how the information they provided was used, so disseminate a copy of the final report to them as well as to key members of the congregation.

Photos can be used to engage your congregation in many ways. In this example, tabletop displays of photos sparked conversations during a meal in a fellowship hall. Each table provided additional feedback about key themes in the research.
Evaluation is an essential task of any program, yet so few congregations engage in it. Perhaps this recipe for visual program evaluation will provide a way to get started or perhaps to maintain the discipline of evaluation as an important part of ministry practice.
Roman R. Williams is an assistant professor of sociology in Grand Rapids, Michigan. He is available to help congregations with self-study, evaluation, innovation and engagement.